The car was then taken to Hadden Hill (we've always taken our cars there) to be serviced and have the cam belt changed.
A total of 478 pound was spent but it later transpired that they hadn't changed the variator or the waterpump. For those that don't know the variator sits on the end of one of the cam and as it starts to wear a petrol engine starts to sound just like a diesel!
Obviously unhappy i walked away not wanting to spend any more money on an engine which would most likely be just fine!
March came and it was due its MOT... it needed 2 tires but i was reluctant to buy new tires because i had my eye on some slightly bigger wheels so i was in the market for some used tires! 20m from Philips tires in Oxford the water pump gave way.
I was recovered back to hadden hill after sitting in the water eaton bus car park for almost 4 hours.

More money was spent and a week later the Alfa drove out. Slightly worried the car didn't seem to have as much power as previous... so the car was returned for them to have a play.
It transpired that they didn't have the proper cam locks and so i can only guess how they timed it up. Not good.
They refunded a big wedge of the money and as our family used them a lot they made right and all was remedied.
Time went on and i suddenly found myself with the modding bug again... this time looking at the stereo.
A set of focal 165KR component speakers, £200 in Dynamat and 2 days had the basics in. It wasn't really perfect and i was a little disappointed in the features achievable by the factory headunit.. so i fitted an aftermarket one but inevitably wanted satnav etc.
I looked at buying an official Alfa Romeo sat nav unit... £1200.
I decided to make my own. With a strong background in IT (IT Manager) i set about choosing components and also looking at amp designs.
Bought 2 Alpine amps... a 4 channel and a mono block

but these were quickly sold as i just didn't like the warmth of the sound. I needed to focus on the end result and for me this could only be achieved by a computer.
Some ideas and sketches started to be made and i had a few ideas.
Eventually i went the route of buying Genesis Amps (i dont have any pictures

)


A four channel amp - which could be used to run a 2 way front end (so tweeters and mids)

2 channel amp - would be used to run rear speakers for back fill

and another 2 channel amp which would be used to run the sub.
It was at this point i managed to acquire a piece of the aluminium extrude which is used to build these amps.

Not being very big... i scratched my head for weeks trying to work out which components would fit for a car computer.
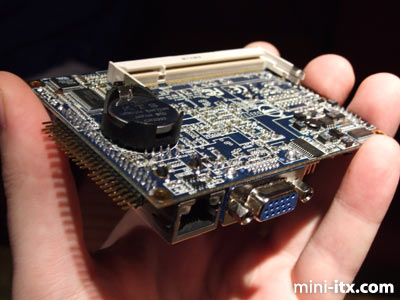
So i decided on a Pico Itx setup.

the main component being the motherboard. I opted for a Pico Itx M10000 - The EPIA PX 10000 is the first motherboard from VIA Technologies to be released in their 10cm x 7.2cm 'Pico-ITX' form factor, and is currently the 'world's smallest full-featured x86 mainboard designed for ultra compact embedded PCs, systems and appliances'.
I then coupled this with a solid state hard drive.....


Needing to find somewhere to mount the hard drive.. we started designing again....


;D

cutting the amp casing to fit... bootiful!!
Screen -
Decided that a 7" touchscreen might fit in place... so bought the screen and a double din adapter...


Decided at this point i didn't like the step on the buttons.. so chopped it out.. re moulded it.. and highlighted all the imperfections before taking it to the car.

Dismantle the car....

Test fit...

Still no where near perfect.. and at this point i was struggling to get it perfect so i had few options...... attack it in the car!!!


testing the hdmi connection into the screen with a skybox....

- she's lovely isn't she?
Moving on -
Steering Wheel - As part of my attempts to make it look Oem i wanted the steering wheel buttons to work as well... so i purchased a new steering wheel... to replace the previous non buttoned version.

To help me achieve my idea i spoke to a couple of companies and one of them sponsored me!


Such a small little device which plugs in via mini usb.
It works on button resistance... these resistances are then mapped to keys on the keyboard! Clever Huh!?

In testing....


Fitted!
Software!
First off i needed to make the loading screen - so a modified bios screen...

Then started looking into lots of different routes for the operating system. For this i used windows 7 lite by Experience (google it)
and then cut some more bits outs.
Then checking the changes as i go along...

i then managed a 10 second from cold boot.
Thats fast!!


This was then wrapped in brushed steel effect vinyl as well as the heater controls as well... pictures to be taken though!
Interior - it previously had a cream and grey cloth interior... god awful!
So stripped it out....

This was then changed for a black leather and red stitch interior

Then added matching gearstick and handbrake gators.... and also a stainless steel round gear sweetheart.

The rear tweeter covers were changed to the bose editions, the dash clocks were changed to the white facelift versions and the front tweeter covers were changed for the later facelift version which included a chrome ring


